• Home
    • Features
    • Testimonials
  • Download
  • How to
    • Blog
    • Help >
      • Videos tutorials
      • Quick Start >
        • How to get songbooks
        • How to get Bibles
        • How to display song lyrics and Bible verses
        • How to import songs and Bibles from other sources
        • How to add/edit songs and announcements
      • Main features
      • Why two modes
      • “Viewer” mode >
        • Songbooks and Bibles
        • The agenda
        • The slides
        • The preview area
        • The keyboard shortcuts
      • Search for >
        • Songs
        • Bible verses
      • Display >
        • A slideshow
        • A PowerPoint
        • A video
      • “Edit” mode >
        • Hierarchical styles
        • Style explorer
        • Edit a song
      • Screen resolution and ratio
      • Import assistant
  • Forum
  • Contact
  • About

VideoPsalm


VideoPsalm's lyrics editor

1/22/2022

65 Comments

 
This topic describes how to highlight specific words of a slide.
VideoPsalm's lyrics editor is a WYSIWYG word processor, where you can set style attributes to specific words.
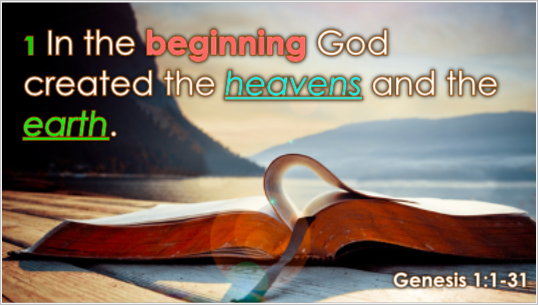
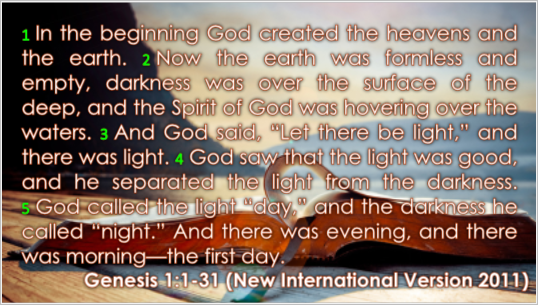
Without any WYSIWYG editor text style changes
Picture
Picture
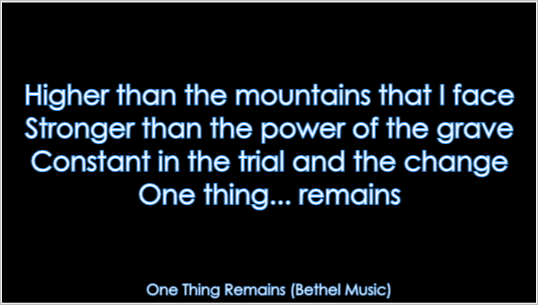
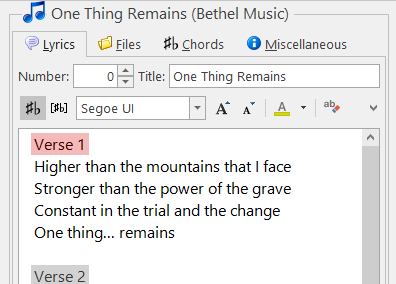
Song lyrics without any particular text attribute
Here, lyrics are rendered in white, with a blue outline.
These settings are set at the slide level.
With WYSIWYG editor text style changes
Picture
Picture
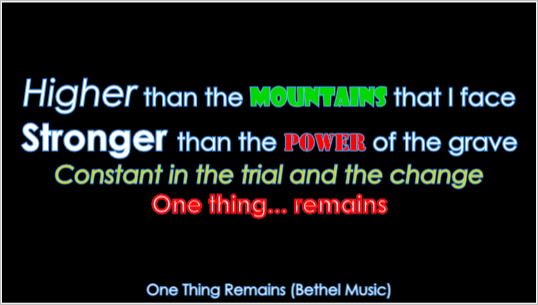
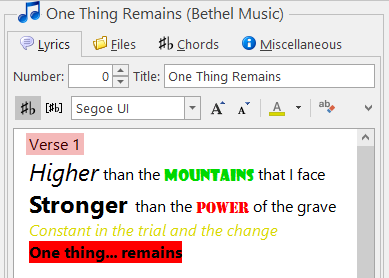
Song lyrics with text attributes
Here, the lyrics are rendered with the same global style (white with a blue outline), and some specific words are highlighted specifically.
There are two layers of text style attributes:
1. The cascading style attributes, that are global to the slide, labeled as layer 1.
2. The lyrics editor style attributes, labeled as layer 2.

Merging of two layers

Picture
When the slide is displayed:
The text attributes from the lyrics editor (layer 2) are merged into the cascading slide attributes (layer 1).

Example with the font

The song verse is set to display in the “Century Gothic” font via the hierarchical style, as can be seen in the layer 1.
Picture
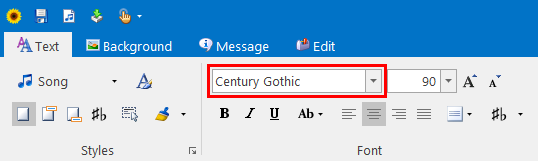
To override this font for a specific word, use the font drop-down located at the top of the text editor (layer 2):
Picture
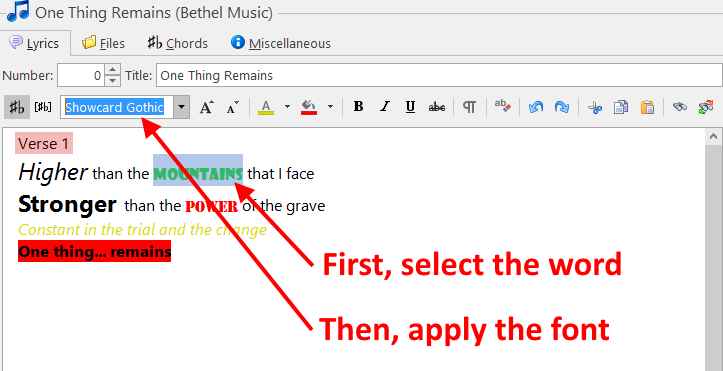
Use the neighoring toolbar buttons to adjust the font size, color, outline, bold, italic, etc. of specific words.
Picture
Notes
  • Some style superpositions do not produce any change.
    Examples with the Bold-attribute (there are other cases):
    If the slide style is set globally to bold in layer 1, and a specific word to bold in layer 2, the word will not get “double-bold”.
    If the slide is set to bold at layer 1, it is not possible to “unbold” a word through this mechanism.
  • Use the layer 2 to set the style of specific words only. To adjust the style of the whole slide, use layer 1.

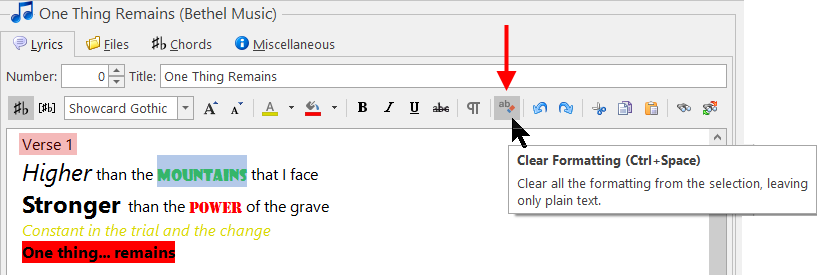
Clear the formatting

To clear the formatting applied to a word, select the word, then press the “Clear formatting” button:
Picture

Display the changes to the presentation screen

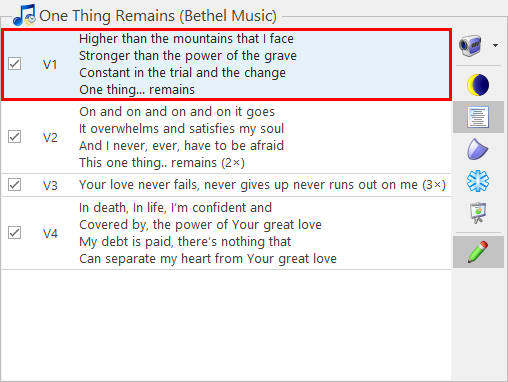
The changes that you make to the song lyrics (text and style) are not reflected automatically.
To refresh a slide, double-click on its text in the slide list:
Picture

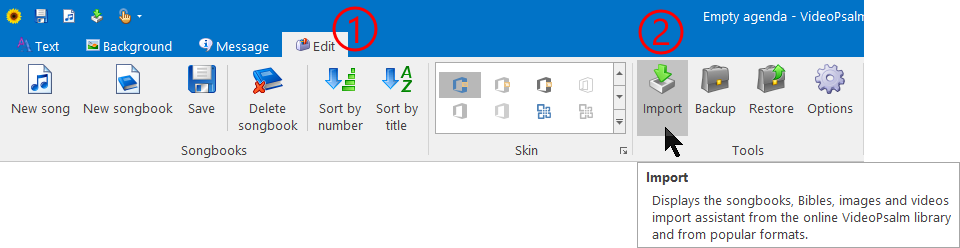
Lyrics editor features

  • Unlimited Undo/Redo (Ctrl+Z/Ctrl+Y), including chords.
  • Copy/Paste, including with chords. Chords are copied or pasted in the ChordPro format.
  • Search and Replace text.
  • Standard word processor short cuts.
  • Chords move with the character where they are attached to.

Lyrics editor YouTube tutorial

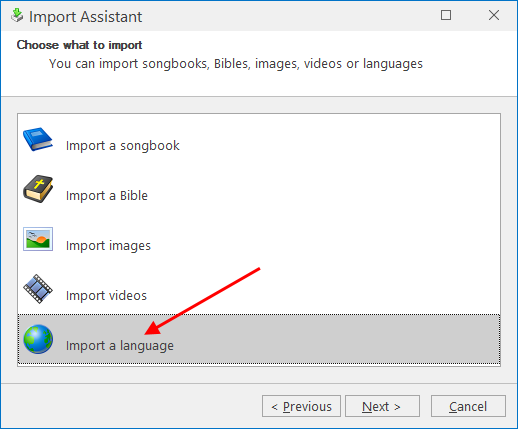
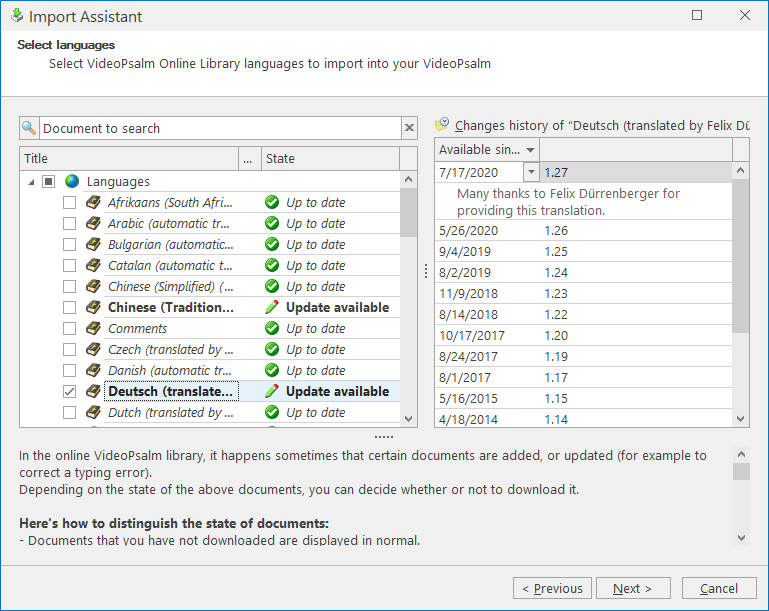
Font substitution for Hindi, Malayalam, Tamil, Korean, etc.

If you often type-in lyrics for a language that uses specific characters, like Hindi, Malayalam, Tamil, Korean, etc., select a font that works well with your language, maybe the Google Noto font.
I am sure that you will well know which font you need.
Note  People using latin alphabet/characters do not need to worry much about font substitution.
You can skip to the next topic.
To set the VideoPsalm lyrics editor default font, open the options -> Lyrics editor, and select it there:
Picture
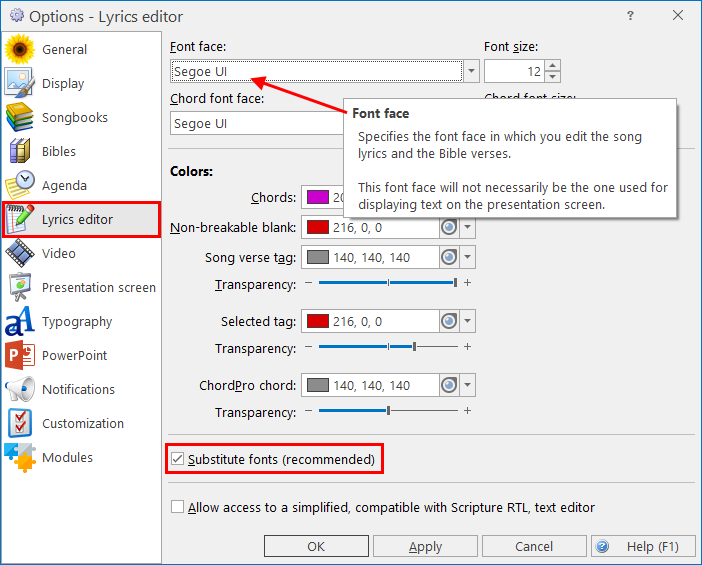
Select the right font for your language, so that VideoPsalm will not need to automatically substitute the font for words containing unavailable characters in the current font.

It is a good idea to select the “Substitute fonts” check-box. This way, you will always be able to see all characters in the editor (as long as your Windows OS has such fonts available).
The VideoPsalm editor will scan all the fonts that the Windows OS has, and will select the first one that has the missing characters.

Interesting article about fonts and world languages

Right-to-left editor

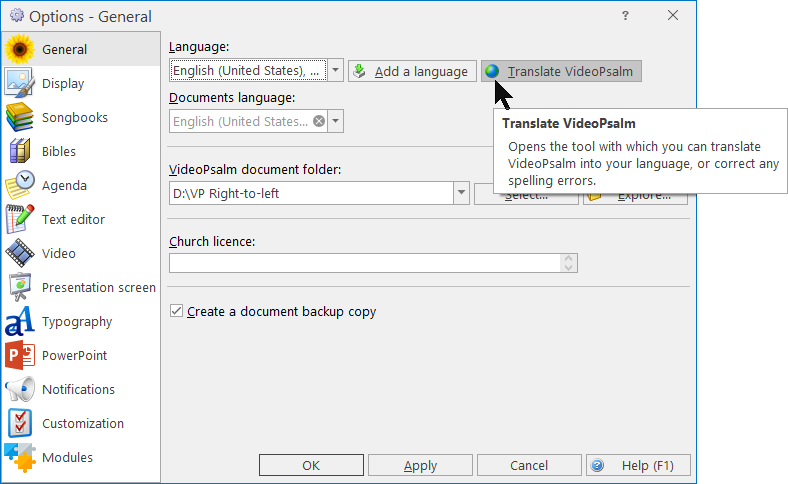
VideoPsalm 1.27 is the first version that fully supports right-to-left (RTL) layout for its dialogs.
See article here

The VideoPsalm editor will provide full Right-to-left language support, hopefully in version 1.28 or 1.29.

To type-in Arabic, Hebrew or any other RTL text in the lyrics editor for version 1.27, proceed as follows:
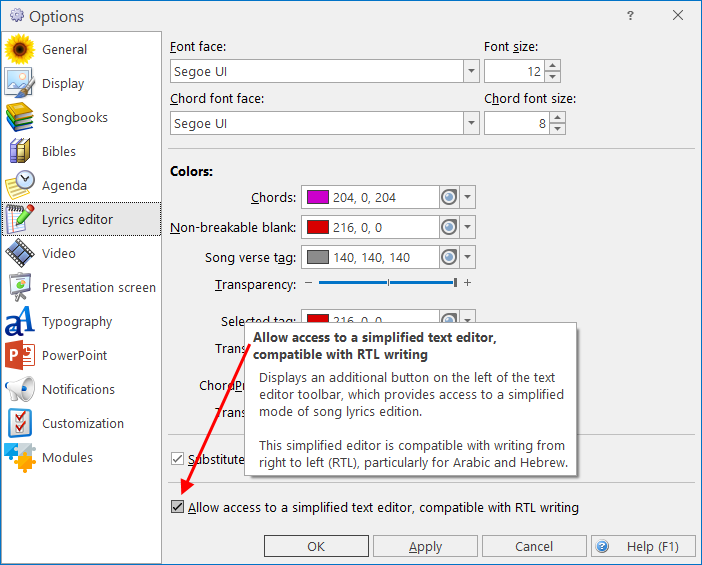
Open the VideoPsalm options -> Lyrics editor, and select “Allow access to a simplified text editor, compatible with RTL writing”.
Picture
You will see a new toolbar button available in the lyrics editor:
Picture
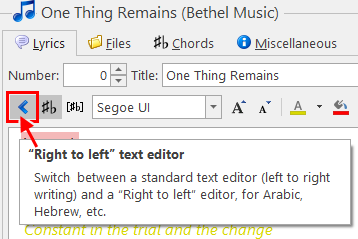
Press this button. The standard lyrics editor will be replaced by a simplified text editor, allowing you to type-in in RTL direction.
The layer 2 features are not available in this editor, however you can instantly switch to the standard lyrics editor, and use the layer 2 toolbar button, with the help of this "Switch"-button.
See also
  • How to edit chords (to be supplied).
65 Comments

How to edit Bible verses and format individual words

1/22/2022

25 Comments

 
This tutorial describes how to edit and format individual verse words, by “converting” a set of Bible verses into a song.
Additionally, this is a solution to display several Bible verses on a single slide.
See examples of this in column 2:
1. Automatic, instant display
Picture
1. Automatic display of a Bible verse
2. Refined, manual display
Picture
2. Formatted Bible verse, after “converting” the verse into a “song”
Picture
1. Automatic Bible verse display, with 5 Bible verses per slide (new feature in VideoPsalm 1.27)
Picture
2. Bible verses “converted” into a “song”, manually grouped into the same slide
See here how to display automatically any number of Bible verses on a slide, starting with VideoPsalm 1.27, as shown in column 1 (Article available here).
Here are 3 scenarios (read further down for how to do it):
  • The pastor is interested in some specific words of the verse (the beginning, the end, the middle, etc..).
    -> “Convert” the Bible verse into a “song”, and keep the specific verse parts:
Picture
  • The pastor needs to emphases specific words of the verse.
    -> “Convert” the Bible verse into a “song”, and highlight the specific words:
Picture
  • The pastor reads a whole chapter or several verses. Some verses are very long, others are short.
    -> “Convert” the Bible verses into a “song”, then split the verses that are long into two or more slides, and put consecutive short verses on the same slide.
    Alternatively, do that automatically as described in this tutorial (starting with VideoPsalm version 1.27).
Picture

Let's “Convert” Bible verses into a “song”

We will consider a passage with verses of different lengths, 1 Corinthians 13.

1. Select the Bible verses:

Picture

2. Important step: Add the verses to the agenda

VideoPsalm can display the selected verses on the fly. However, in our case right now, add the Bible verses into the agenda.

Note: In general, it's always a good idea, during the service, to put viewed items into the agenda, including the items that you display on the fly.
This way, you have them on hand in case the pastor returns to some previously cited verse.

Click the “Add” button to add the Bible verses to the agenda:
Picture

3. Make the Bible verses editable

Right-click the Bible verses agenda item and select the highlighted menu item:
Picture
This has the effect of “converting” the Bible verses into a free text, a “song” actually, that you can edit at leisure.
VideoPsalm puts this Bible verse “Song” in a new songbook called “Bible verses”.
This songbook is created on the fly if it does not exist already.
Consecutive Bible verse “songs” will be added to one of the songbooks marked as such (see the Personalized Bible verses checkbox below):
Picture
Note  When you search for songs, VideoPsalm doesn't look into “Bible verses” songbooks.
The screen shot below illustrates how VideoPsalm converted the Bible verses into a song:
Picture

4. Edit the "Bible verse" song

In the above screen shot, several areas are highlighted:
  1. VideoPsalm created a songbook called “Bible verses”.
    it is in this songbook that VideoPsalm puts custom Bible verses.
    As shown higher-up, you can create more songbooks of Bible verses, by selecting their "Personalized Bible verses" checkbox.
  2. The icon of such songbooks is represented by a Bible.
    "Bible verses" songs are represented by a “Message bubble” icon.
  3. In the example above, I have slightly edited the verses:
    I removed the line break between verses 6 and 7, and between verses 9 and 10.
    These verses are short and can fit on a single slide.
  4. The slide numbers correspond to the verse numbers.
    You can edit your verses, for example merge two consecutive verses that are short, and the verse numbers will keep matching to the song verse number.
  5. I configured the songbook header and footer to display the Bible verse reference and the Bible name.
    This all is done automatically when you tell VideoPsalm to make the Bible verses editable.

To complete the operation, configure the songbook to display its verses with a similar style as your Bibles, for example by assigning a Bible image to its background. This way, all the Bible verses in this songbook will automatically appear with this image.

Tell us if this suits some of your scenarios!

Other articles of interest
  • Display verses from two different Bible translations at the same slide (bilingual display)
  • How easily and fast you can display song lyrics and Bible verses to your assistance
  • Tricks: Display Bible verses quickly, the way you want them to be (bilingual, several verses on one slide, etc.)
25 Comments

Translate VideoPsalm into a new language

1/18/2022

31 Comments

 
This tutorial describes how you can translate the VideoPsalm application into a new language.
It consists into translating the texts, buttons, tool-tips, messages, etc.
that appear in the VideoPsalm dialogs.
It is easy to translate VideoPsalm into ANY language!
It is done directly from within VideoPsalm, and can be automated with the Google Translate tool.
All you need is your VideoPsalm application and your own language knowledge, which is priceless!

A HUGE thank you to our precious contributors!

1. Contact us first

Before you start to help, please use the contact form or let us know by email.
This will prevent potential duplicated translation work.

2. Check if your language is in the list

VideoPsalm is available in more than 50 languages.
The available languages are displayed in the VideoPsalm option dialog:
Picture
In the "General" tab, expand the language drop-down, and select your language :
Picture
If your language is not in the list, still maybe somebody may have translated it since you installed your VideoPsalm:
  1. Make sure you run the latest VideoPsalm version.
    You can download the latest version from here.
  2. Check the VideoPsalm online library.
    Your language may be newly available there:
Picture
In the Import assistant dialog, select "Import a language" from the VideoPsalm online library:
Picture
The VideoPsalm online library contains the up-to-date list of languages.
It highlights new or updated languages:
Picture
If your language is not available (= you don't see it in the list), read further...

3. Add your language to VideoPsalm

In the VideoPsalm options, in the "General" tab, click the "Translate VideoPsalm" button:
Picture
This opens the VideoPsalm integrated translation tool, from where you can change the texts that appear in the VideoPsalm menus and dialogs, or add a new language:
Picture
Panel 1. The label panel
The label panel lists all the labels that VideoPsalm uses.
There, you can edit the labels, as you would in Excel.
By default, the "Comments" column is selected.
Comments help to know what a label is for and were it appears. (However, not all labels are commented.)

Panel 2. The language panel
When you select a language in the language panel (2), a corresponding column appears in the label panel (1).
Photo
You need to click twice on a language to select it: the first click marks the language, and the second click selects the checkbox.
Keep the “Comments” ticked, as they will help you translate the texts.

Select 2 languages:

Language 1: A source language, where you are most fluent with, or one that is close to your language.
The choice of the source language is critical, it can significantly speed-up your translation work.
If possible, select English, French, German, Dutch.
Note 1  Depending on the VideoPsalm version, labels are fully available in English, French, Dutch and German.
Other languages may miss newer labels.
Note 2  Some translations have been done by an automatic translation tool.
For your source language, select a human (= better translation) translated language from the list below.

List of VideoPsalm human/better translated languages:
Afrikaans
Chinese
Czech
Deutsch
Dutch
English
Español
Finnish
Français
Indonesian
Korean
Lao
Lithuanian
Norwegian
Polish
Portuguese
Romanian
​Russian
Swedish
Tamil
Thai
In this tutorial, for the source language, let's select English.

Language 2: Select a target language. In panel (2), additionally select the language that you want to contribute for its translation.
Let's select Russian.

You now have 4 columns displayed in the label panel (1):
1. Id
2. Comments
3. The source language (English)
4. The target language (Russian)
Picture
Now is the right time to reorder the columns.
Drag & drop the "Comments" column header to get following positions:
1. Id
2. The source language (English)
3. The target language (Russian)
4. Comments

You get something like this:
Picture
If you don't need the "Comments" column, deselect it in the language panel (2) to hide it:
Picture
Use the mouse to resize the column headers:
Picture

4. If you can't find your language in the list...

Press the "Add..." button:
Picture
This opens the "Add languages" dialog, where you will find a lot more of the world languages:
Picture
Select a language and press "Add" to add it to VideoPsalm.

In the "Add languages" dialog, languages that are already available in VideoPsalm are grayed out, you cannot add them anymore.

If your language is not found in the list, add it manually:
Picture
In the dialog that opens, type-in your language name:
Picture
Use the name corresponding to the official language code, found here:
Official world language code lists

5. Translation work

Collapse the integrated help panel and maximize the window, to see more columns and rows:
Picture
  • You can edit the texts like in an Excel spreadsheet.
  • To sort the texts alphabetically, click on a column header. This brings to the top all untranslated labels.
  • To sort on an additional column, click the column header while pressing the "Shift" keyboard key.
    This is useful for example to additionally sort on the id.
    Indeed, labels that are in the same Id range will be grouped together, which is good, because they appear normally in the same dialog.
  • To filter the texts containing specific words, type-in the words in the “Search” textbox:
Picture
  • To find a phrase or expression, enclose it in double quotes:
    "Save the agenda"
  • To display only labels that are not translated, use the filter and select the "(Blanks)" entry:
Picture

6. Automatic translation

Since version 1.27, VideoPsalm operates with "Google Translate" to automatically translate the labels in around 120 world languages.
VideoPsalm will translate the source column (column 1) into the target column (column 2).

1. Select the empty cells to translate.
Alternatively, you can select the source cells, it doesn't matter. The selected rows are what matters.
To select a range of cells, click the first cell, then, while pressing the "Shift" keyboard key, click the last cell.
To add more cells, click on them while pressing the "Ctrl" keyboard key.

2. Right-click and select "Translate selection":
Picture

After a short moment, the Russian text fills the selected cells:
Picture
The automatic translation uses a free service from Google.
This function requires an Internet connection.
Your free translation credit granted by Google may get used up.
If you don't have anymore credit, VideoPsalm will fail to translate the labels.
In this case, wait for an hour or two to get your credit back again.
If necessary, instead of waiting, temporarily use a VPN, for example TunnelBear.
TunnelBear has a free plan that is big enough for this and it works wonderfully.
TunnelBear will ask for your email.
It is all what is required to get a free plan with them.

7. Check your translation

To check your translation in its context, select your language in the “Language” panel, then click the “Apply” button.
VideoPsalm will instantly display your translated texts where they belong, in every dialog.
Picture
You can then use VideoPsalm in the language that you just translated, and test if everything displays as expected.
Repeat this until you are satisfied with the result.

8. Save your work

Save your work by clicking the “Save” button.
Picture

9. Send us your work

When your work is complete, send us your translation by clicking the “Send” button.
Send us the relevant zipped (compressed) file, as an email attachment.
In this example, this would be the “Русский (Россия), ru-RU.zip” file (Russian):
Picture
Once we receive your language file, we make it available online for others to use.

When a new language is added to the VideoPsalm online library, all VideoPsalm users get notified, via a toast, the next time they start VideoPsalm:
Picture
When they click on the toast, VideoPsalm opens the language import assistant, where they can select the language(s) to add or update in their own VideoPsalm:
Picture
Let us know how you would like your card to appear on the contributor's page.
A picture of you or your avatar is welcomed.

Thanks in advance for your help.
31 Comments
Forward>>

    Categories

    All
    Bible
    Bilingual
    CCLI
    Language
    SongSelect
    Translation

    Archives

    December 2022
    August 2022
    June 2022
    March 2022
    February 2022
    January 2022
    December 2021
    April 2021
    July 2020
    June 2020
    May 2020
    December 2018
    August 2017
    July 2017
    January 2017
    October 2016
    July 2016
    June 2016
    July 2015
    June 2015
    May 2015
    February 2015
    January 2015
    November 2014
    September 2014
    July 2014
    June 2014
    May 2014
    April 2014
    March 2014
    December 2013
    November 2013
    September 2013
    August 2013
    June 2013
    May 2013
    April 2013
    February 2012

    RSS Feed

Powered by Create your own unique website with customizable templates.