To sync songs between multiple computers, you can use a service like DropBox, OneDrive or any other similar cloud solution.
VideoPsalm usually stores its songbook files in the following folder:
C:\Users\Public\Documents\VideoPsalm
To setup your VideoPsalm to sync with DropBox:
1. With a File Explorer, copy the "C:\Users\Public\Documents\VideoPsalm" folder and its whole content into a DropBox folder, for example into "C:\Users\Marc\DropBox\VideoPsalm".
2. Start VideoPsalm.
It will load its documents (songbooks, Bibles, images, videos, etc.) from the usual location, namely from "C:\Users\Public\Documents\VideoPsalm".
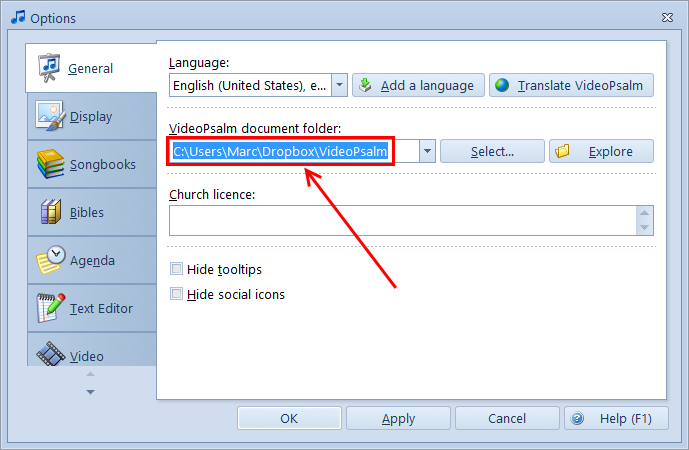
3. In its settings, tell VideoPsalm to load its files from the DropBox location:
VideoPsalm usually stores its songbook files in the following folder:
C:\Users\Public\Documents\VideoPsalm
To setup your VideoPsalm to sync with DropBox:
1. With a File Explorer, copy the "C:\Users\Public\Documents\VideoPsalm" folder and its whole content into a DropBox folder, for example into "C:\Users\Marc\DropBox\VideoPsalm".
2. Start VideoPsalm.
It will load its documents (songbooks, Bibles, images, videos, etc.) from the usual location, namely from "C:\Users\Public\Documents\VideoPsalm".
3. In its settings, tell VideoPsalm to load its files from the DropBox location:
4. Click "OK" and confirm that you now want VideoPsalm to load its settings from this DropBox folder.
The next time that you start VideoPsalm, it will remember to load its documents from this new location.
5. Proceed from step 3 on all PCs that you want to sync your songbooks with.
Additional points and remarks
The next time that you start VideoPsalm, it will remember to load its documents from this new location.
5. Proceed from step 3 on all PCs that you want to sync your songbooks with.
Additional points and remarks
- You will need to "share" your DropBox VideoPsalm folder with the other PCs, so that they get the changes from the other PCs.
- It is recommended to set the same DropBox folder path on all PCs.
Indeed, by default, DropBox's shared folder is located here:
C:\Users\<username>\DropBox\
This means that each PC sharing a DropBox folder for VideoPsalm, will by default have a different folder path.
For example on the church PC, you will end-up with:
C:\Users\Church\DropBox\
And on you home PC, you will have:
C:\Users\Marc\DropBox\
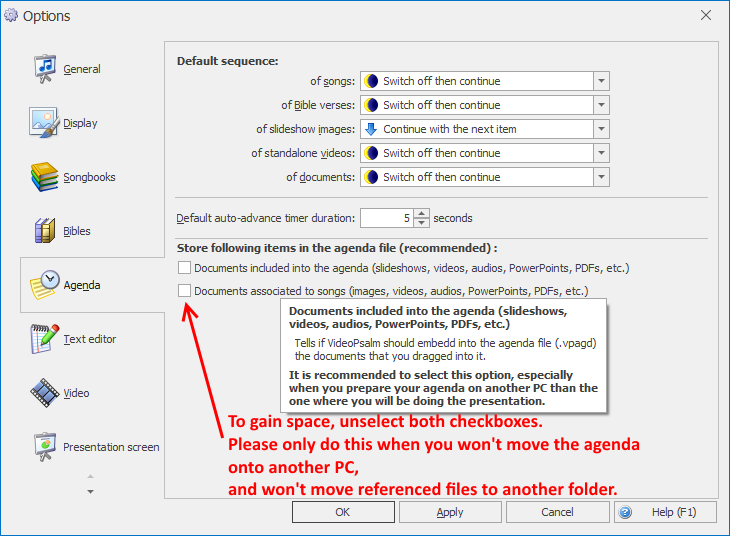
With such a setup, you are forced to embed referenced documents (PowerPoints, slideshow images, etc.) into their agendas.
Although this is the default VideoPsalm behavior, it is a waste of space, especially when using DropBox.
To eliminate this restriction, switch your DropBox shared folder for example to the following one:
C:\DropBox\
And set this identically on all PCs.
With this trick, you be able to gain space (and synchronization time) with the agenda size.
To tell VideoPsalm not to store referenced documents in the agenda (and gain DropBox disk space), configure this in the VideoPsalm settings, by deselecting the highlighted checkboxes:
- If you implement the previous trick, be sure to understand the implications well.
In particular, the agendas won't contain the referenced files (images, videos, PowerPoints, etc).
VideoPsalm will fail to display them if you open such agendas on a PC where the referenced files are absent. - To recapitulate:
This trick lets you gain disk space by allowing to store your agendas without embedding the referenced files.
The referenced files need to reside in the DropBox folder. - For more information about how to move a DropBox folder to another location:
Move a DropBox folder (DropBox help)
Move a DropBox folder (How To Geek) - Make sure that the changes from other PCs are propagated onto the PC before you start VideoPsalm.
Alternate solutions to transfer songbooks, new songs and song corrections from one PC to another
a) Use an agenda
1. On your home PC, type-in new songs and make song corrections.
2. Put all new or edited songs into an agenda.
3. Save the agenda onto a USB stick.
4. On the church PC, open the agenda from the USB stick.
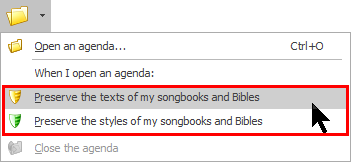
Before opening the agenda, make sure that the "Agenda open options" are deselected:
VideoPsalm will propagate the changes into the church PC songbook.
If the church PC songbook doesn't exist, VideoPsalm will create it.
5. Save your changes on the church PC:
If the church PC songbook doesn't exist, VideoPsalm will create it.
5. Save your changes on the church PC:
b) Transfer the songbook directly
1. On your home PC, type-in new songs and make song corrections.
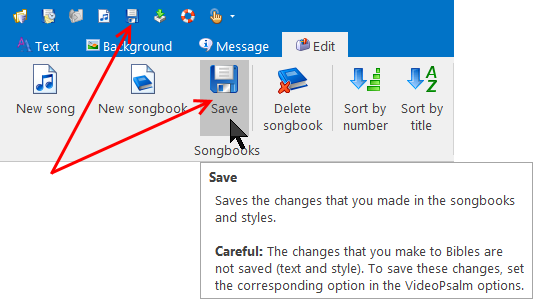
2. Save your songbook changes.
3. Locate the songbook file on your hard drive.
A handy way of doing this is to open the VideoPsalm options, and press the "Explore" button:
1. On your home PC, type-in new songs and make song corrections.
2. Save your songbook changes.
3. Locate the songbook file on your hard drive.
A handy way of doing this is to open the VideoPsalm options, and press the "Explore" button:
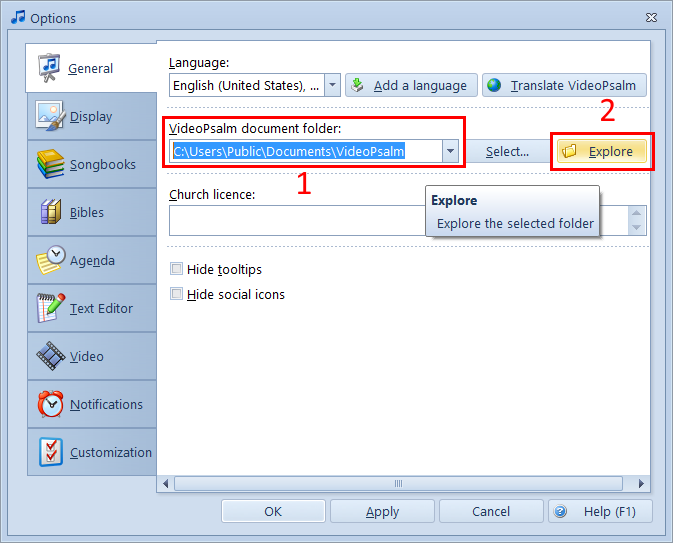
Your songbooks are located into the "Songbooks" sub-folder.
4. Copy the songbooks onto a USB stick.
5. On the church PC, paste your USB stick songbooks to the corresponding songbook VideoPsalm folder.
6. Open VideoPsalm.
c) Use the VideoPsalm backup/restore feature
How to backup VideoPsalms' data or start it from a USB stick (portable VideoPsalm)
http://myvideopsalm.weebly.com/blog/how-to-backup-videopsalms-data-or-start-it-from-a-usb-stick-portable-videopsalm
 RSS Feed
