• Home
  • Download
  • Features
    • Testimonials
  • How to
  • Help
    • Videos tutorials
    • Quick Start >
      • How to get songbooks
      • How to get Bibles
      • How to display song lyrics and Bible verses
      • How to import songs and Bibles from other sources
      • How to add/edit songs and announcements
    • Main features
    • Why two modes
    • “Viewer” mode >
      • Songbooks and Bibles
      • The agenda
      • The slides
      • The preview area
      • The keyboard shortcuts
    • Search for >
      • Songs
      • Bible verses
    • Display >
      • A slideshow
      • A PowerPoint
      • A video
    • “Edit” mode >
      • Hierarchical styles
      • Style explorer
      • Edit a song
    • Screen resolution and ratio
    • Import assistant
  • Blog
  • Contact
  • About

VideoPsalm


How to edit / correct a slide during the presentation

9/29/2013

15 Comments

 
Spelling mistakes that are particularly troublesome are those displayed to hundreds of people, who read them all at the same time, while singing...

So, what is needed to correct a slide during the presentation? It requires a bit of dexterity, but ultimately nothing more than a keyboard, a mouse, and a few seconds:
1. If VideoPsalm is not yet in “Edit” mode, go into it by clicking on the “Pencil” Button at the right of the screen.
The text editor opens in the central panel. It displays the song lyrics, and enables you to edit them freely, even during the presentation.
Do you see the spelling mistakes? They are highlighted in red:
Picture
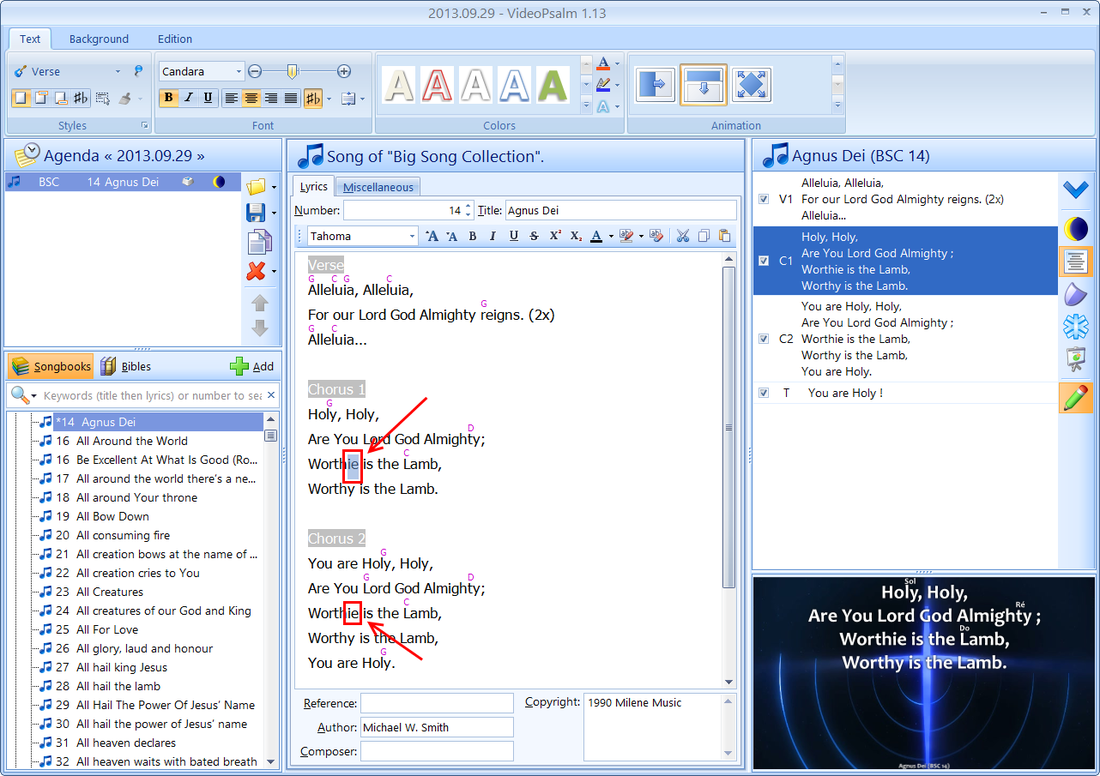
In this example, the first chorus is already displayed, and its spelling mistake too, alas...

2. But it is not too late to react: there is plenty of time to correct the other mistakes while the assistance is singing the current slide.
In case the corrections take more time than expected, promptly display the next verse, while making further corrections.

I must say that I really appreciate this feature. In practice, I often use it to split too long verses in two, by inserting a blank line at the right place, usually at the end of a sentence.
Splitting a long verse in two slides enables the people at the back of the room to see better.

Tip  To refresh a live slide that you just edited, double-click on it.
It is the only occasion where you need to double-click on a slide.
15 Comments

How to display a picture slideshow from within VideoPsalm

9/19/2013

36 Comments

 
From within an agenda, VideoPsalm can display a slideshow.

To create a slideshow in your agenda, you can either:
  • Drag and drop your images from the desktop or from a file explorer into the VideoPsalm agenda surface,
Photo
or
  • Use the agenda “Open” button, then select “Add slideshow images”.
    ​You can then select one or several images from your hard drive:
Photo
Advantages of showing your slideshow with VideoPsalm:
  • Your slideshow is integrated with your songs, your Bible verses, etc.:
    Easily display anyone of them, for example in two clicks.
  • With drag and drop, easily reorder your slideshow images.
  • Your agenda contains all the data for your presentation.
    Save it on a USB stick, open it on another PC, and you are all set.
  • VideoPsalm makes best use of your screen real estate:
    It displays your pictures in full screen, proportionally scaling your pictures so that they occupy the maximum screen surface, without ever modifying their aspect ratio whatsoever.
  • It also wont show any borders or any floating toolbar on top of your pictures:
    The audience will give all the attention to the picture only.
  • VideoPsalm offers a consistent set of transitions between slides.
  • Last but not least: you can loop through your image slideshow automatically.

​Note
​
When you add images, videos or PowerPoints to your agenda, VideoPsalm makes a copy of these files into its own temporary folder and displays them from there. This means that if you make changes to one of these documents from outside of VideoPsalm, your changes won't be immediately reflected into VideoPsalm.

To force VideoPsalm to take your external changes into account:
  1. Remove the corresponding item from your agenda,
  2. Add the item again from its file location.

See also:
  • How to automatically loop through slides
36 Comments

How to automatically loop through slides

9/19/2013

38 Comments

 
Most of the time, you will want to tell VideoPsalm exactly when to advance to the next slide. It could be when your people start singing a song, or when they advance to the next song verse, etc.

At other times, for example during the announcements, you may want VideoPsalm to loop regularly through all announcement slides, at a fixed time interval.

Another scenario would be to loop through an image slideshow at regular time intervals, again without you having to manually press the “Down” key.

Lets describe how to configure the first scenario.

1. looping through all slides of a song or a Bible verse list:

The example that follows shows how to display announcements in a loop.
The same example is applicable to song verses or Bible verses.

a) Let's create an “announcement” song that has three slides, for example:


Verse 1
Wednesday 25. September
 
20:00 Prayer meeting
Description
Location
etc.


Verse 2
Saturday 28. September
 
19:00 Youth group
Description
Location
etc.


Verse 3
Sunday 29. September
 
10:00 Morning service
Description
Location
etc.


Trick  To insert a blank line in a slide, simply add a blank character (a space) at the start of the line.
You can see that there is a blank line in each slide, after the date line (the title).

Note  It is a good idea to store all your “Announcement” songs in an “Announcement” songbook, where you will store all your announcements. Announcements are nothing else than “songs” that contain announcements instead of lyrics.
This way, you can chose a specific format for all your announcements, certainly different from the one you have for your songs.

See also:
  • How to create a new song or a new songbook

b) Add the announcement “song” to the agenda
This is an important step: Once a song (or any other item for this purpose) is into the agenda, it gets some enhanced functionality, like for example the possibility to automatically loop through slides.

c) Select the “Loop” progress mode, either via the drop-down, or via the context menu (right-click on the announcement):
Picture
Select the progress mode via the drop-down...
Picture
...or via a right-click on the announcement.
Right-clicking on the agenda item gets you the bonus option to set the time interval between two slides.

Available options:
  • The default option is to “Advance manually” through the slides: You chose when to advance to the next slide, either by clicking on the next slide, or by pressing the “Down” key on your keyboard.

    Note  VideoPsalm is compatible with remote presenter devices, and uses the standard keyboard shortcuts that you are used to in other presentation software, like Microsoft PowerPoint.

  • The “Play to end” option enables to automatically advance through the slides of a song or Bible verses once only. This auto-advance mode stops when the presentation reaches the last slide.

  • The “Loop” option will restart indefinitely to the first slide once the last slide has been displayed. To stop the sequence, simply press the “Down” key on the last slide. This will stop the loop sequence. Another way to stop the loop is to select another song in the agenda or in the songbook list.

2. Looping through images of a slide show

VideoPsalm can easily display a picture slideshow, from within the agenda.

To tell VideoPsalm to loop through your slideshow images, select them all with the mouse (click on the first image, then Shift+click on the last image) and assign them either the “Loop” or “Play to end” option, as a whole, via the context menu that you get when you right-click on them:
Picture
See also:
  • How to display a picture slideshow with VideoPsalm
38 Comments

    Categories

    All
    Bible
    Bilingual
    CCLI
    Language
    SongSelect
    Translation

    Archives

    December 2022
    August 2022
    June 2022
    March 2022
    February 2022
    January 2022
    December 2021
    April 2021
    July 2020
    June 2020
    May 2020
    December 2018
    August 2017
    July 2017
    January 2017
    October 2016
    July 2016
    June 2016
    July 2015
    June 2015
    May 2015
    February 2015
    January 2015
    November 2014
    September 2014
    July 2014
    June 2014
    May 2014
    April 2014
    March 2014
    December 2013
    November 2013
    September 2013
    August 2013
    June 2013
    May 2013
    April 2013
    February 2012

    RSS Feed

Powered by Create your own unique website with customizable templates.