This article describes how to configure and use VideoPsalm for different teams on the same PC, each team having its own folder of documents.
For example:
- The Sunday morning worship team,
- The youth group team on Saturday night.
Each team will want to find their songbooks, settings, styles, backgrounds, etc. and modify them, without impacting the other team.
The idea is to prepare two icons on the desktop, one for the Sunday worship, one for the Saturday youth group :
This way, each group manages its documents independently of the other group.
The documents for Sunday worship are those stored in the standard documents folder :
C:\Users\Public\Documents\VideoPsalm
And those for the youth group will be stored for example in the following folder:
C:\Users\Public\Documents\VideoPsalm Youth Group
When you start VideoPsalm, it loads following documents :
- songbooks,
- Bibles,
- settings,
- background images,
- background videos.
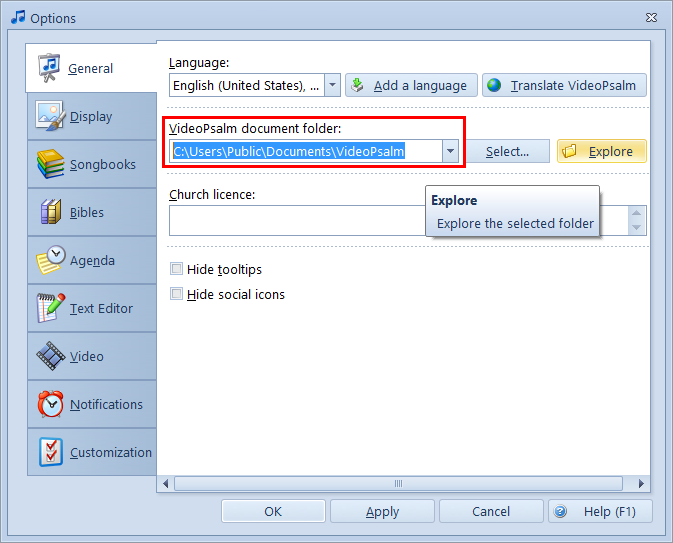
To change the document folder, open the VideoPsalm options and select it in the "General" tab:
The documents for Sunday worship are those stored in the standard documents folder :
C:\Users\Public\Documents\VideoPsalm
And those for the youth group will be stored for example in the following folder:
C:\Users\Public\Documents\VideoPsalm Youth Group
When you start VideoPsalm, it loads following documents :
- songbooks,
- Bibles,
- settings,
- background images,
- background videos.
To change the document folder, open the VideoPsalm options and select it in the "General" tab:
Then click "OK".
VideoPsalm will load the documents from the new folder.
This may take a few seconds depending on the number of documents to load.
The next time you start VideoPsalm, it will remember to load the documents from the new folder.
If you select an empty folder, VideoPsalm will end up with no Bible, no image, etc. in it.
To add documents to it, import predefined songbooks and Bibles with the help of the VideoPsalm import assistant.
There are three ways to create a new VideoPsalm document folder:
Solution 1
Make a backup of your document folder to another folder, for example from the folder
C:\Users\Public\Documents\VideoPsalm
to the file:
C:\Users\Public\Documents\VideoPsalm Youth Group
Solution 1
Make a backup of your document folder to another folder, for example from the folder
C:\Users\Public\Documents\VideoPsalm
to the file:
C:\Users\Public\Documents\VideoPsalm Youth Group
The following article describes how to backup a VideoPsalm document folder:
How to backup VideoPsalms' data or start it from a USB stick (portable VideoPsalm)
How to backup VideoPsalms' data or start it from a USB stick (portable VideoPsalm)
Solution 2
1. From within VideoPsalm, switch to another document folder, for example to:
C:\Users\Public\Documents\VideoPsalm Youth Group
2. Import songbooks and Bibles using the VideoPsalm import assistant.
1. From within VideoPsalm, switch to another document folder, for example to:
C:\Users\Public\Documents\VideoPsalm Youth Group
2. Import songbooks and Bibles using the VideoPsalm import assistant.
Solution 3
Use a Windows file manager and copy the folder
C:\Users\Public\Documents\VideoPsalm
to the folder:
C:\Users\Public\Documents\VideoPsalm Youth Group
Lastly, set-up your desktop for both VideoPsalm icons
From now on, we will consider that the following two document folders exist:
For the Sunday worship service: C:\Users\Public\Documents\VideoPsalm
For the youth group: C:\Users\Public\Documents\VideoPsalm Youth Group
Right-click on the VideoPsalm icon on the desktop, and select "Properties":
In the dialog box that opens, adjust the following fields:
1. In the "General" tab, rename the icon to "VideoPsalm Sunday worship".
2. In the "Shortcut" tab, in the "Target" field, at the end of the line, specify the folder to open for the service:
/f="C:\Users\Public\Documents\VideoPsalm"
Normally, the target now contains the following text:
"C:\Program Files\VideoPsalm\VideoPsalm.exe" /f="C:\Users\Public\Documents\VideoPsalm"
3. Press "OK" to save your changes and close the dialog.
4. Copy and paste the VideoPsalm icon (Ctrl+C, Ctrl+V), to get a second shortcut.
5. Rename the second icon to "VideoPsalm Youth group".
6. Right-click on the second icon, select the "Properties" menu and select the "Shortcut" tab.
7. In the "Target" field, replace
/f="C:\Users\Public\Documents\VideoPsalm"
with
/f="C:\Users\Public\Documents\VideoPsalm Youth Group"
8. Click "OK" to save your changes and close the dialog.
Your two icons are now configured and each group will be able to work independently with respect to the documents.
All they need to do is to start VideoPsalm with the right icon.
If you need to, you can go a step further in compartmentalizing, and create a Windows account for each group.
 RSS Feed
